How To Create & Set Up Google My Business (2024 Guide)

Embarking on the journey of setting up your Google Business Page? This comprehensive guide walks you through every stage, from account creation to claiming and verifying your new Google Business Page. Before you dive in, familiarize yourself with the setup process, and then follow the steps below to create your new business page.
Setting Up Your Google My Business Listing
To begin, you’ll need a Google-linked or created account to set up and manage your Google My Business page. Follow these steps to get started:
- Account Setup:
- If your website already utilizes Google Analytics and Google Search Console, it’s advisable to use the same account to manage your Google My Business page. This streamlines your access and monitoring across all Google products.
- If you don’t use any of these services, you’ll need to create a Google account. Ensure to use this account consistently across all Google products.
- Creating a Google Account:
- Visit https://accounts.google.com/signup to create your Google Account.
- Once created, you can use the same username and password to sign in to any Google product, whether you signed up through the main page or a specific product’s signup page.
- Account Verification:
- After creating your Google Account, verify its existence by entering your email address. This step ensures that you have an active Google Account ready for use.
By following these steps, you’ll establish a solid foundation for setting up your Google Business Page. With your Google Account in place, you’re now ready to embark on the process of claiming and verifying your new Google Business Page. Let’s get started!
Step 1: Creating Your Business Page

Begin by visiting Google My Business at the following link:
https://business.google.com/create
Once there, follow these steps:
- Sign In:
- Access the platform by signing in with your Google Account. If you don’t have one yet, you can create a new account easily.
- Get on Google:
- After signing in, you’ll be ready to start creating your business page and harnessing the power of Google’s platform for your business’s online presence.
- After signing in, you’ll be ready to start creating your business page and harnessing the power of Google’s platform for your business’s online presence.
Step 2: Selecting or Adding Your Business

Begin by typing your business name into the designated field. As you type, a list of businesses matching that name will appear.
Follow these steps:
- Check for Existing Listings:
- Review the list of businesses that appear and see if any match your own. If you find a match, select the correct listing.
- Select Your Business:
- If your business is listed, choose the correct entry to proceed.
- Create a New Business:
- If your business is not listed, select the option to “Create a business with this name” to add your business to Google’s platform.
Step 3: Business Name

Provide the name of your business. This should be the real-world name of your business, as you would answer the phone.
Enter the name of your business in the designated field.
For example: “Add Name of Business – Create a Google My Business Page – Online Ownership”
Step 4: Business Category

Begin by describing what your business does in the provided field.
Then, select the most appropriate category or type of business that closely aligns with your business’s offerings.
After your business has been created, you’ll have the opportunity to add and refine your category selection as needed.
Step 5: Local Business or Service Area
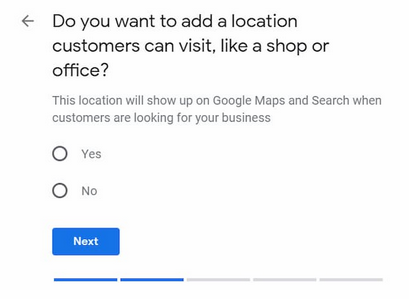
Would you like to add a physical location that customers can visit, such as a shop or office?
- If yes, you have a physical business location that customers can come to. You will be prompted to provide the address of your business.
- If no, you are a service area business, and you visit customers at their location. You will be asked to select the areas you serve.
Step 6: Additional Service Area

This step pertains to businesses that have selected they have a physical location by entering an address.
Do you also serve customers outside of this location?
- If yes, this applies if you have a physical business location but also provide services at a customer’s location.
- If no, customers are required to come to your business location.
Step 7: Business Contact Details

Enter your telephone number.
After your business page is created, you’ll have the option to add a secondary telephone number.
Provide your business website URL.
Step 8: Manage Listing

Choose “Finish.”
Afterward, you’ll have the option to continue enhancing your listing by adding photos, a business description, and more.
Alternatively, you can select “Later” to proceed to your account dashboard, where you can continue editing or verifying your listing.
Congratulations on creating your Google My Business Listing! The final step is to verify your business, typically done via postcard. Google My Business will send a verification PIN number through mail, which usually takes a couple of days to arrive.

Keep an eye out for the postcard in your mailbox.
Once you receive it, visit https://google.com/verifymybusiness or log into your GMB account dashboard at https://business.google.com/locations.
Important:
After requesting your verification postcard, do not change any main business details such as name or address. Doing so will invalidate the PIN number you requested. Only make changes to name or address after receiving and verifying the PIN number.
Recent Posts
- Email Marketing in Rohini | Creating Attractive Emails

- Brochure Designing and Printing in Rohini | Online Brochure Designers

- 99 Code Design: The Best Website Designing Agency in Rohini Sector 3

- Logo Designing in Delhi, Rohini, and Siraspur

- Presentation Design Services

- Social Media Post Design Services

- Email Template Design in India

- How to Select an Agency for Digital Marketing?

- Why Is It So Important to Pick the Top Digital Agency in Rohini?

- Machine Learning’s Effect on Optimizing Digital Marketing


